
DIY Entryway Storage Bench

This entryway storage bench is made out of one single sheet of Purebond Birch ¾” plywood. Kreg did a contest in September of 2017 (hence the Fall décor) where you had to make something out of one sheet of plywood. Designing and building this for the contest was a fun challenge! I love this piece, because it is useful, attractive, and budget-friendly. When is there not a need for more storage or for another place for someone to sit? If you’d like to make this storage bench, follow my plans below!
*This post contains affiliate links at no extra cost to you. View my full disclosure here.
Supply List:
- (1) 4’x8’ sheet of Purebond Plywood (I used birch)
- 1-1/4” pocket-hole screws
- 1” wood screws
- Wood glue
- Wood filler
- Paint (or stain if your prefer)
- Polycrylic
- Edge banding
- Door hinges
- Knobs- found mine at Hobby Lobby
- Magnet latches (optional)
- 1-1/4” brad/finish nails
Tools used:
- Circular Saw
- Jig Saw (here are the blades I use)
- Drill
- Pocket-Hole Jig
- Clamps
- Speed square
- Miter saw
- Plunge Router (there are other options, see step 5 for more details)
- Brad nail gun
- Random orbit sander
- Iron
- Band-it/Razor blade
- 10 Million Dollar Stick (optional)
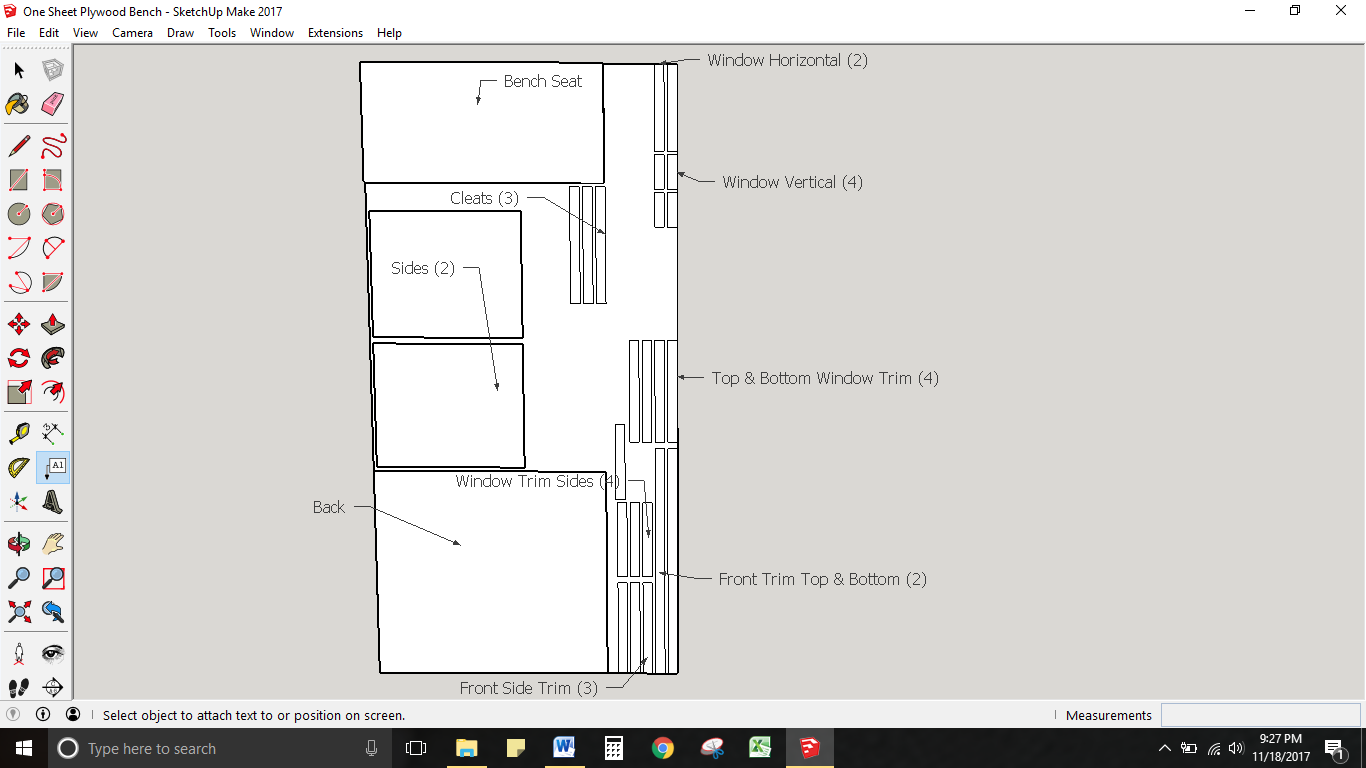
Step 1: Draw out your measurements on your plywood
- Back: 36-3/4”W x 33”H
- Sides (2): 23-1/4”W x 19-1/2”H
- Bench Seat: 36-3/4”W x 18” H
- Bench Cleats (3): 1-1/2”W x 18”H
- Window Horizontal (2): 1-1/2”W x 13-1/8”H
- Window Vertical (4): 1-1/2”W x 5-1/4”H
- Window Frame Top and Bottom (4): 1-3/8”W x 16-1/8”H
- Window Frame Sides (4): 1-3/8”W x 12”H
- Door Stops (2): 1/2”W x 3”H (w/magnets) OR 1”W x 3”H (without magnets)
- Bench Cleats (3): 1-1/2”W x 18”H
- Front Trim Top and Bottom (2): 1-1/2”W x 36-3/4”H
- Front Side Trim (3): 1-1/2”W x 15”H
I like to use the edges and corners of the plywood as much as possible, because they have that factory straight edge! That means fewer cuts for you. Phew! Use the diagram below to draw the same images onto your own plywood.
Step 2: Rip your plywood down using the measurements you drew
- I used my circular saw to cut all of my pieces, and for some of the small pieces I used my miter saw and 10 million dollar stick, but if you’re more comfortable with, or you only have, a table saw, then that would work just as well, but it would be a good idea to have the home improvement store cut it down for you first! When I first started out with my circular saw, I made this handy-dandy guide to keep my cuts straight (click here to see my guide). It works very well, and now I have a Kreg Rip-Cut. Which I also love!
***While you’re cutting, make sure you label what your pieces are. You can do that by using a pencil, sticky notes, or whatever suits your fancy. Keep them separated and organized to make things a little bit easier on you later.***
Step 3: Round the corners of the back and the armrests
- You can round the corners of your storage bench a couple of different ways. I used a 10gallon bucket to actually trace my rounded corners by getting the bucket as close to the corner as was possible, but not letting it hang off the sides at all. And then I cut those out with my jig saw. I purposefully cut outside of the line just a smidge, so that I was sure I wouldn’t make the corners too small. Looking back, I wish I had tried to cut out the corners with my plunge router, because I think I would have gotten a smoother cut, and I wouldn’t have had to sand so much later (I’m all about saving time, if you can’t tell).
- After I cut out the corners, I sanded them as smooth as I could get them. I love my Bosch random orbit sander. This step is very important, because a smooth surface is necessary for your edge banding to stick properly!
Step 4: Make all of your pocket-holes
- Next, I decided to drill all of my pocket holes at one time. I, of course, love my Kreg K4 pocket-hole jig!
- It’s very important that your pieces are completely flat against the jig. If they’re not, say on a piece for your door, then the hole will be crooked and will make your screw go in crookedly, and your door will not lie flat (not that that would ever happen to me!). My doors worked out pretty well, but one of them is not completely flat, and the perfectionist in me notices it every time I see the bench!
- Where to place pocket holes:
- 3 on either side of the back piece under where the actual bench will go.
- 3 on either side of the bench seat, to attach to the side pieces.
- 1 on either end of the cleats, to attach to the back and the trim.
- 1 on either end of these trim and door pieces:
- Front Side Trim
- Window Side Frame
- Window Horizontal
- Window Vertical
- Front Trim Bottom only
Step 5: Assemble the storage bench
Start this process by attaching the sides/armrests to the back support. The back edge of the side piece will be flush with the back edge of the back piece. Always check for square! I used wood glue and 1-1/4” pocket-hole screws for attachment.
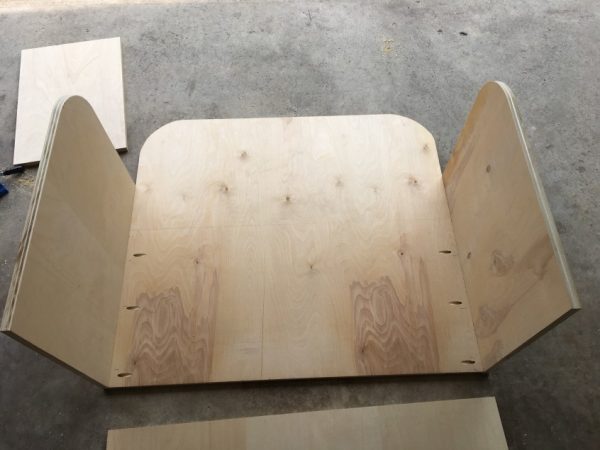
- Next attach your bench cleats. One goes on both side pieces (I turned these ones on their side), and one directly in the middle. The top of each cleat should be 17-1/4” high. I used a combination of wood glue, wood screws (1” screws, about 3 along each side piece only), and pocket-hole screws to put these on. Note: You will not be putting the front pocket-hole screw in until the front trim is on.
- You can then attach your bench seat with wood glue and 1-1/4” finish/brad nails.
- ***If you are planning on attaching your doors with your normal everyday hinge, you need to cut out a spot for them to fit both on your door and your trim. I traced the shape of the hinge on the spots where it would go on the door and trim. I then cut that shape out 1/8” with my router (you can also use an oscillating tool or a handsaw and chisel).***
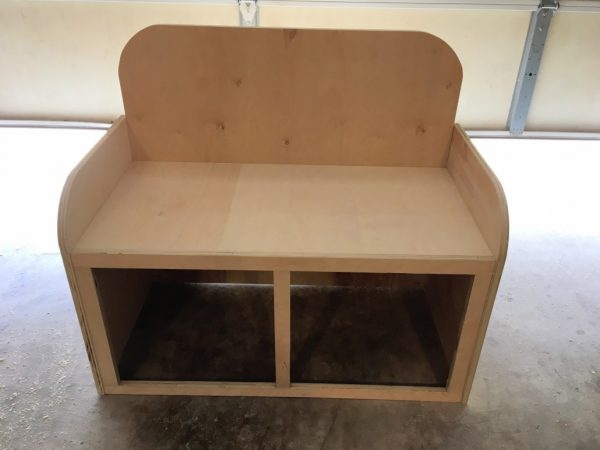
- The next step is to attach the trim! Again, I used a combination of wood glue, pocket-hole screws, and brad nails in my nail gun to attach these.
It would work best to go in this order:
- Top
- Bottom
- Side
- Middle (make sure this piece is RIGHT in the middle)
- Side
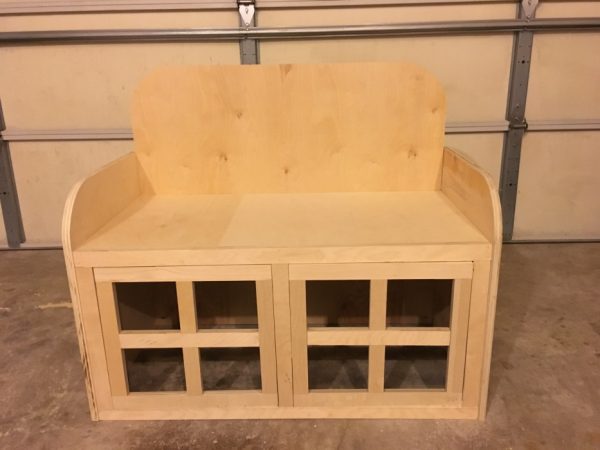
- You can then assemble your doors with 1-1/4” pocket-hole screws and wood glue. It should work well if you make the outside square first then attach the long middle piece, then the top and bottom pieces.
I did a dry fit with the doors to make sure that the doors fit how I wanted them to:
Step 6: Edge banding
- Get your iron ready, set aside a good chunk of time, and start edge banding like a mad-person!
- This is the iron-on edge banding that I use (click here)
- Once your iron is hot, move it slowly along the edge banding, making sure that it’s hot enough to melt the adhesive.
- I like to heat a small portion up, smooth it down with something like a putty spreader, and then move on to the next portion.
- Parts to edge band:
- Back, sides, and trim that sits flush with the bench (the trim is optional, because the edge banding will be slightly taller than the bench itself, since you’re adding on an extra piece)
- Once it’s cooled, trim the edges with something sharp. I use my handy-dandy Band-it, and a sharp razor. I find that it works pretty darn well.
Step 7: Fill, sand and finish
- I filled my brad nail holes with wood filler (click here). Once that’s dry, you can move on with the sanding.
- You only need to do a light sanding with 220grit sandpaper. You really want to make sure you go lightly, because you don’t want to sand through the veneer top of the plywood!
- I finished my storage bench with white spray paint and Minwax’s polycrylic.
- I didn’t have my Homeright Finish Max Paint Sprayer then, but I do now, and I love the time that it saves me! If you plan on doing many projects, I would highly recommend investing in a paint sprayer.
Step 8: Hinges, doors, door stops, knobs, and magnets
- Attach the doors on your storage bench by screwing your hinges to the side trim and the door.
- Add your knobs of choice. I found mine at Hobby Lobby on a week when they were 50% off. Woot woot!
- FINALLY, I attached the door stops, with wood glue, so that my door magnets would have a place to be screwed into. If you’re not planning on using these magnets, then you will want to use the larger sized door stop in the measurements at the beginning of the plan.
- I bought these door magnets to allow my doors to snap shut. This is totally optional, but I like how it keeps the door closed all the way when we’re not using them.

I hope that you enjoy this build and find it useful in your home.
Happy building, friends!
-Whitney
You can also find Restoring Handmade on Facebook, Instagram, and Pinterest!
Other projects you might like:


Subscribe here to get the latest news.
I solemnly swear to never spam you.