
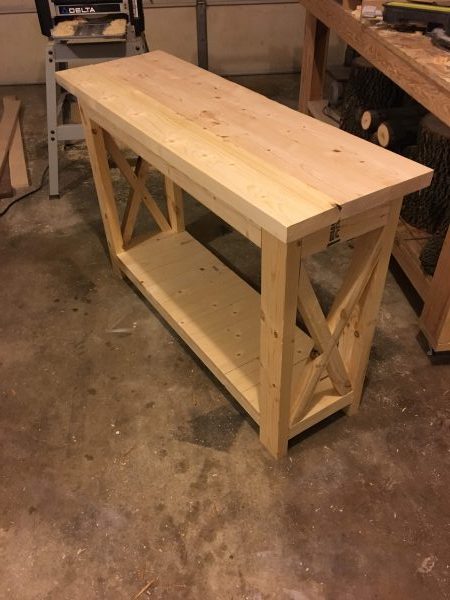
DIY Farmhouse X-Console Table

Entryways can often be forgotten about when decorating a home, because there are usually more pressing things on your decorating and furnishing to-do list (think beds, tables, and other super functional furniture). Fortunately, adding a console table can be one easy and fun thing that will add a lot of character and warmth to the entrance of your home.
Console tables can get really pricey, so why not make one? For $30 in lumber and some good old fashioned elbow grease, you can make this rustic farmhouse console table for yourself. It’s a great beginner project to up your game and encourage you to save money making countless other pieces around your home (careful, you will become addicted).
Follow the tutorial below to make this table! Make sure you read the plans through before beginning and wear proper personal protective equipment while you build.
*This post contains affiliate links at no extra cost to you. View my full disclosure here.
What you’ll need:
Materials:
- (1) 2 x 6 x 4 pine board
- (2) 2 x 6 x 8 pine board (you can combine the first board and this one for (1) 2 x 6 x 12 if you can fit it in your car/truck)
- (1) 2 x 4 x 4 pine board
- (1) 2 x 4 x 8 pine board
- (1) 1 x 4 x 8 pine board
- (1) 1 x 4 x 6 pine board
- (3) 2 x 2 x 8 furring strip
- Wood glue
- Stain
- Polyurethane
- White paint
- 2 1/2″ pocket hole screws
- 1 1/4″ brad nails
- Wood filler
- Sandpaper
Tools Used:
- Miter saw
- Orbital sander
- Kreg K4 Pocket Hole Jig
- Brad nail gun
- Clamps
- Drill
- Router (optional)
- Paint sprayer (optional)
- Thickness planer or table saw (optional, see step 2)
Cutlist:
- (3) 2 x 6 x 48″ (table top)
- (4) 2 x 4 x 30″ (legs)
- (2) 2 x 4 x 38 1/2″ (long aprons)
- (2) 2 x 4 x 9 3/4″ (short aprons)
- (4) 2 x 2 x 26″ (X braces)
- (2) 2 x 2 x 38 1/2″ (long bottom shelf)
- (2) 2 x 2 x 9 3/4″ (short bottom shelf)
- (11) 1 x 4 x 12 3/4″ (bottom shelf slats)
- (2) 1 x 4 x 9 3/4″ (bottom shelf ends)
Step 1: Cut your wood
- Using a miter saw (HERE is mine and I love it!) and the cutlist above, cut all your wood to the length it needs to be.

Step 2: Square up edges of wood (optional)
- When you buy 2x (two-by; talking about thickness) wood like pine, you might notice that it comes with a rounded edge. There are a few ways to square up that edge to give it a more polished look. My method is to use a thickness planer and give it a pass or two on each side. You can also do this by ripping about 1/8″ off each edge with a table saw. If you happen to have a jointer, that might be the ideal tool for this!
- Again, this is totally optional, BUT it does give your piece a cleaner look, and it will help the table top boards fit together nicely, avoiding the “crumb catcher” that’s caused by joining two rounded edges. Do this only to the table top pieces, the legs, and the top aprons.
Step 3: Join table top and route
- Drill (4) pocket holes with the Kreg Pocket Hole Jig along the edge of (2) of the (3) table top boards.
- Glue the edges and screw the boards together with 2 ½” pocket hole screws as shown in the picture below.
- To add a nice element to the console table top, you can route a chamfered edge with your router around the perimeter. I did this with my Ryobi plunge router (HERE) and it worked wonderfully!


Step 4: Build base frame
- Drill (2) pocket holes into the ends of each apron piece. These will be attached to the legs at the very top (see pictures).
- Also, drill 2 pocket holes on the edge of each apron piece, as these will be what you attach your table top with later.
- Use wood glue and 2 ½” pocket hole screws to attach the apron to the legs.
- After the top aprons are on, move onto the bottom shelf.
- Again, drill (2) pocket holes in the ends of each bottom shelf piece (the 2×2’s). Then attach them to the legs 1 ½” from the ground. You can do this by using a 1 ½” piece of wood to hold up your shelf piece.
- Attach the shelf holders with wood glue and 2 ½” pocket hole screws.


Step 5: Attach base shelf
- Taking all of your 1 x 4 pieces, simply nail them into place along the bottom shelf holders with 1 ¼” brad nails and a brad nail gun (HERE’S mine).


Step 6: Attach X braces
- This seemed like the trickiest part of the build for me as I had never done it before, but making the X braces is very doable, even for beginners!
- My method may not be the most conventional, but it worked! First, I held my 2×2 up diagonally so that the wood lined up with the corners. Then I drew pencil lines for where I needed to cut, and adjusted my miter saw to the angle I needed. After cutting the first one, I glued and nailed it into place with my brad nailer.
- You can use the same method for the second part of the X. Hold it up where you want it to go, draw the lines for the cut, adjust your miter saw, and then cut them accordingly.
- It’s quite a bit harder to nail the second X piece into place, so I ended up just gluing it with wood glue. It will be plenty strong and since this table won’t see a lot of pressure and wear, those pieces aren’t going anywhere.

Step 7: Fill holes and sand
- To add another more professional look, fill in all nail holes and knots in the wood with wood filler.
- Once the wood filler has hardened, whip out the orbital sander and plan on having some nice quality time with it. I’ve had my Bosch orbital sander since the beginning of my woodworking days, and I love it still! You can find it HERE. You might want to start with 80 grit, move onto 120, and then 220 grit.
- Sand the table so that everything is smooth and ready to be finished off.

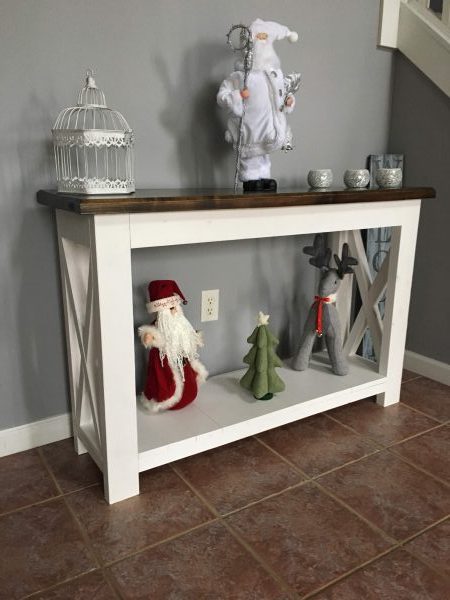
Step 8: Stain top
- Once your console table has been sanded, wipe it clean and stain it with your favorite color of stain. I used a combination of stains, because it took some tries to get the desired color. If I am remembering correctly, I started with Early American, then put on a light coat of True Black, and then did a coat of Dark Walnut- all Minwax brand. The color actually turned out really cool and I love the depth that it has.
Step 9: Paint base
- To give this console table a true farmhouse rustic feel, I painted the base white with normal latex paint. You can do this any way you like, but I pulled out my Homeright Finish Max paint sprayer to do this job. Painting isn’t my favorite thing, so I love using this to make it go faster and provide a more professional finish.
Step 10: Attach top to base and finish
- Once everything is dry, attach the table top to the base with the pocket holes you made earlier. There is no need to use wood glue here, just 2 ½” pocket hole screws! Just make sure that the table is lined up evenly on the base.
- The topcoat is the last thing that you need to apply. One of my favorite polyurethanes is this Varathane Triple Thick in matte. It’s water based, which means that you can use it for both the base and the table top, and it goes on thick and leaves a really nice finish.
- I applied the polyurethane with my paint sprayer, lightly sanding in between coats, and it was fast and easy.
- Let the poly cure for a few days before letting things sit on it. After a couple of days, lightly sand the finished table with water and a fine grit sandpaper to smooth out any bumps you may find. I find that this final step provides a super smooth finish that I love touching!

That’s it!
This console table may seem intimidating to build if you’re a brand-new woodworker, but with the right planning and tools, you can certainly build one too!
Let me know what you think and if you would build this table as well.
Have a great day!
-Whitney
You can also find Restoring Handmade on Facebook, Instagram, and Pinterest!
Other projects you might like:


Subscribe here to get the latest news.
I solemnly swear to never spam you.
I love this I am currently making it. I would love if you took more pictures up close or if there was an option to enlarge them it would be helpful to me as a beginner. I did mess up one part I did not put the pocket holes on edge of aprons so now I must take it apart, but its all about the learning.
Hi, thank you for reaching out! That’s good to know about the pictures, I will try to make them bigger as soon as I can. But I’m so glad you’re giving it a go, and you’re right, building is a big learning process!!
Where did you get the 2x pine boards?
I got mine at Menard’s, but you can also get them at Home Depot and Lowe’s. Just make sure to find the straightest ones you can 😊
Hi, I have been all over and no one carries Pine 2 x but I ended up buying kiln dried wood.
I am going to get started. Wish me luck.
I have to modify the width.
Good luck! You will do awesome. Let me know if you have any questions along the way!
Hi again,
I am making my X ends now and I am having a hard time making the short X pieces, any cut tips?
Thank you so much,
Cindy
I found that lining the piece up where it will go, drawing the cut marks, and then adjusting my miter saw to the line worked for me! If your saw isn’t able to make those angles, you might be able to hold the wood at the angle needed and support it with another piece of wood so it doesn’t slide. If you do something like that, just make sure it’s a safe cut!
Thank you,
I am going to give it another try today.
Hi Whitney,
I finished my entry table today.
I love it! Thanks for the plans and responding to me.
PS I don’t know how to send you a picture.
Yay! That’s great news, way to go! You can email me a picture at restoringhandmade@gmail.com I’d love to see it!
I’m not fully understanding where you drilled your holes to mount the top piece .
In step 4 I say to drill 2 pocket holes in the edges of the apron pieces. You want the holes to be on the inside so that you don’t see them (on the same face as the holes you drilled to attach the aprons to the legs). They should be positioned so that you drill up into the table top. Does that make more sense?
Hi! I’m wondering what the dimensions are on this table? I love it!
Hi Lisa! The table is 48″ wide at the top and is 31.5″ tall.
Thank you! I was also wondering the depth, like how far off the wall does it come? I need something 12 inches or less. I’m going to see if my hubby will build this for me. He may need to make some adjustments. We are just trying out woodworking for the first time.
Oh, that’s my bad I should have given the depth! This one is about 16.5″ deep. You can certainly adjust some of the measurements to fit your space. Good luck, woodworking is so fun, I hope you love it!