Easy DIY Wood Burned Tree Branch Name Cards

If you’re looking for a fun way to personalize your next event, burning names on slices of wood branches could be for you! It’s easy and fun, and it really doesn’t take much time.
How do you get wood branches you ask? Well, a friend gave me a couple of branches that he had cut from a tree in his front yard. Maybe you, a neighbor, or a friend has a tree that needs a little trimming! Or, you can search on Facebook or Craigslist to see if anyone has any that they’re trying to get rid of. Ask around and you might just get what you’re looking for!
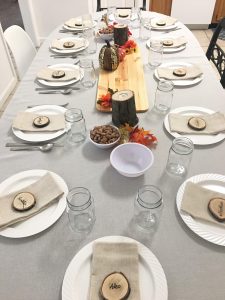
We used these wood branch name cards for a Thanksgiving dinner we hosted with some family and friends, and everyone was thrilled to take their names home with them afterwards! It was a fun way to help people feel welcome in our home.
Below you will find the quick and easy steps to making your own tree branch name cards, so be sure to read through the steps before starting. Have fun!
*This post contains affiliate links at no extra cost to you. View my full disclosure here.
What you’ll need:
Materials:
- Tree branch
- Paper
- Polyurethane (optional, see step 4)
Tools:
- Miter saw
- Wood burning kit
- Pen
- Scissors
Step 1: Cut wood slices
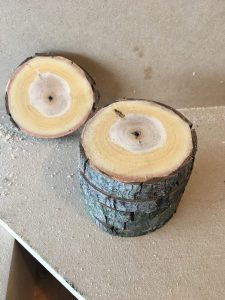
- Cut your branch into individual slices about ½” thick using your miter saw. Make sure you do this safely, since the branch is round and uneven! Keep the branch clamped and keep your hands away from the blade. For this step, I also made cuts in small passes, instead of one big cut down. It seemed to help my wood not move so much.
Step 2: Print & cut out names
- Choose your desired font and size. I used Dancing Script at 48pt. It made the names close to 2” wide and about ¾” tall. Make sure your font and size will fit on your branches!
- Once you lay out all the names on something like a Word document, you can go ahead and print it out. Then you will want to cut out each name into a small slip of paper.
Step 3: Trace and burn names
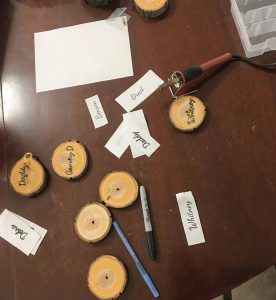
- Lay the slip of paper centered on a slice of wood. Then take a pen and trace the outline of the name on the paper so that it leaves an indent into the wood piece.
- With your hot wood burning kit, burn the names by tracing over the indentations you made with your pen.
Step 4: Finish with poly (optional)
- You can totally be done after step 3 (that’s what I did!), but if you want to seal your branch name cards, feel free to put a layer or two of polyurethane on them!
And you’re done! It’s an easy evening project and I found that it’s fun and relaxing to work on the wood burning while you’re watching your favorite show.

Let me know if you make these for yourself!
-Whitney
You can also find Restoring Handmade on Facebook, Instagram, and Pinterest!
Other projects you might like:


Subscribe here to get the latest news.
I solemnly swear to never spam you.