DIY Rustic Wooden Picture Blocks with Clips
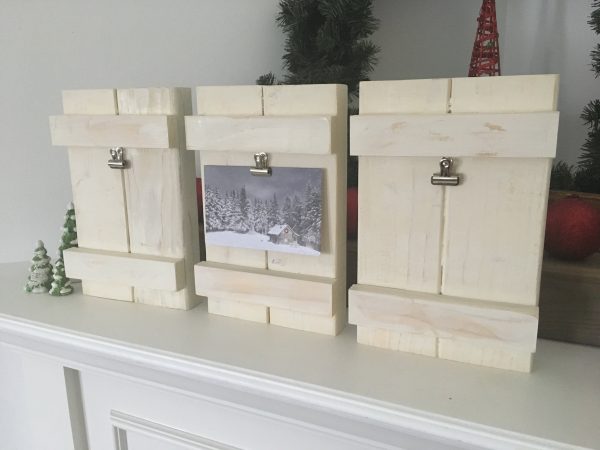
Here’s a quick and crafty tutorial for you today! Last November, I was planning out DIY gifts I was going to make for relatives. I came across this project from the ever-so-awesome Shanty 2 Chic ladies, and decided to make some with the wood that I already had on hand. These picture block hangers are a little bit chunkier than the ones they made, so they can either stand up on their own or be hung from a wall with some rope.
Follow along with the tutorial below to see exactly how I made these picture blocks, and if you’re looking for something a little slimmer, here is the link to the Shanty 2 Chic tutorial!
*This post contains affiliate links at no extra cost to you. View my full disclosure here.
What you’ll need:
Materials:
- (1) 2 x 4 x 6’
- (1) 1 x 2 x 4’
- (3) Metal clips (I found mine for 1/2 off at Hobby Lobby!)
- Antique white paint
- Polycrylic
- Hot glue
- Wood glue
- Brad nails
- Sand paper
Tools Used:
- Miter saw
- Brad nailer
- Glue gun
- Orbital sander
- Paint brushes
- Clamps
Cut list:
- (6) 2 x 4 x 11”
- (6) 1 x 2 x 7”
Step 1: Cut your wood
- Using the cutlist above and your miter saw, cut the boards to the given sizes.
Step 2: Assemble picture blocks
- Using wood glue and clamps join the edges of the 2×4’s. Put (2) 2×4’s next to each other, so that you have a total of (3) blocks. Let them sit for 20-30 minutes.
Step 3: Nail on trim
- Using wood glue and brad nails in your nail gun (I used 1 ¼” nails. You want at least 1”nails, but they can be up to 2″) attach the 1×2 trim on the top and bottom of each block.
- Line them up an inch from the top and an inch from the bottom. That leaves plenty of room for the clips and standard 4×6 pictures.


Step 3: Paint
- Using your choice of paint, I used Antique white (the cheap one from Walmart!), paint the picture blocks with 1-2 coats.

Step 4: Distress
- Once the paint is totally dry, use your orbital sander to distress the paint a little bit. I made mine a little chippy, but not too worn looking. You can also sand by hand if you don’t have a sander!

Step 5: Finish
- It’s a good idea to give these wooden picture blocks a couple of coats of Polycrylic to protect them. It’s a good idea to use a water-based poly like this so that the finish doesn’t yellow your paint!
Step 6: Glue on clips
- Once your Polycrylic is all dry, use your hot glue gun to attach the little metal clips! HERE are the ones I found at Hobby Lobby for 1/2 off! Just center them below the top trim piece and you’re good to go!


See how easy that was! This project is fun and quick. These picture blocks make great gifts or statement pieces for your own home.

Let me know if you build these and how they turned out for you!
Thanks for following along,
-Whitney
You can also find Restoring Handmade on Facebook, Instagram, and Pinterest!
Other projects you might like:


Subscribe here to get the latest news.
I solemnly swear to never spam you.